이 포스트는 한성현 교수님의 iOS 프로그래밍 실무 수업을 듣고 작성하였습니다.
오늘은 먼저 Table View 에 대해 간단히 포스팅해 보겠습니다.
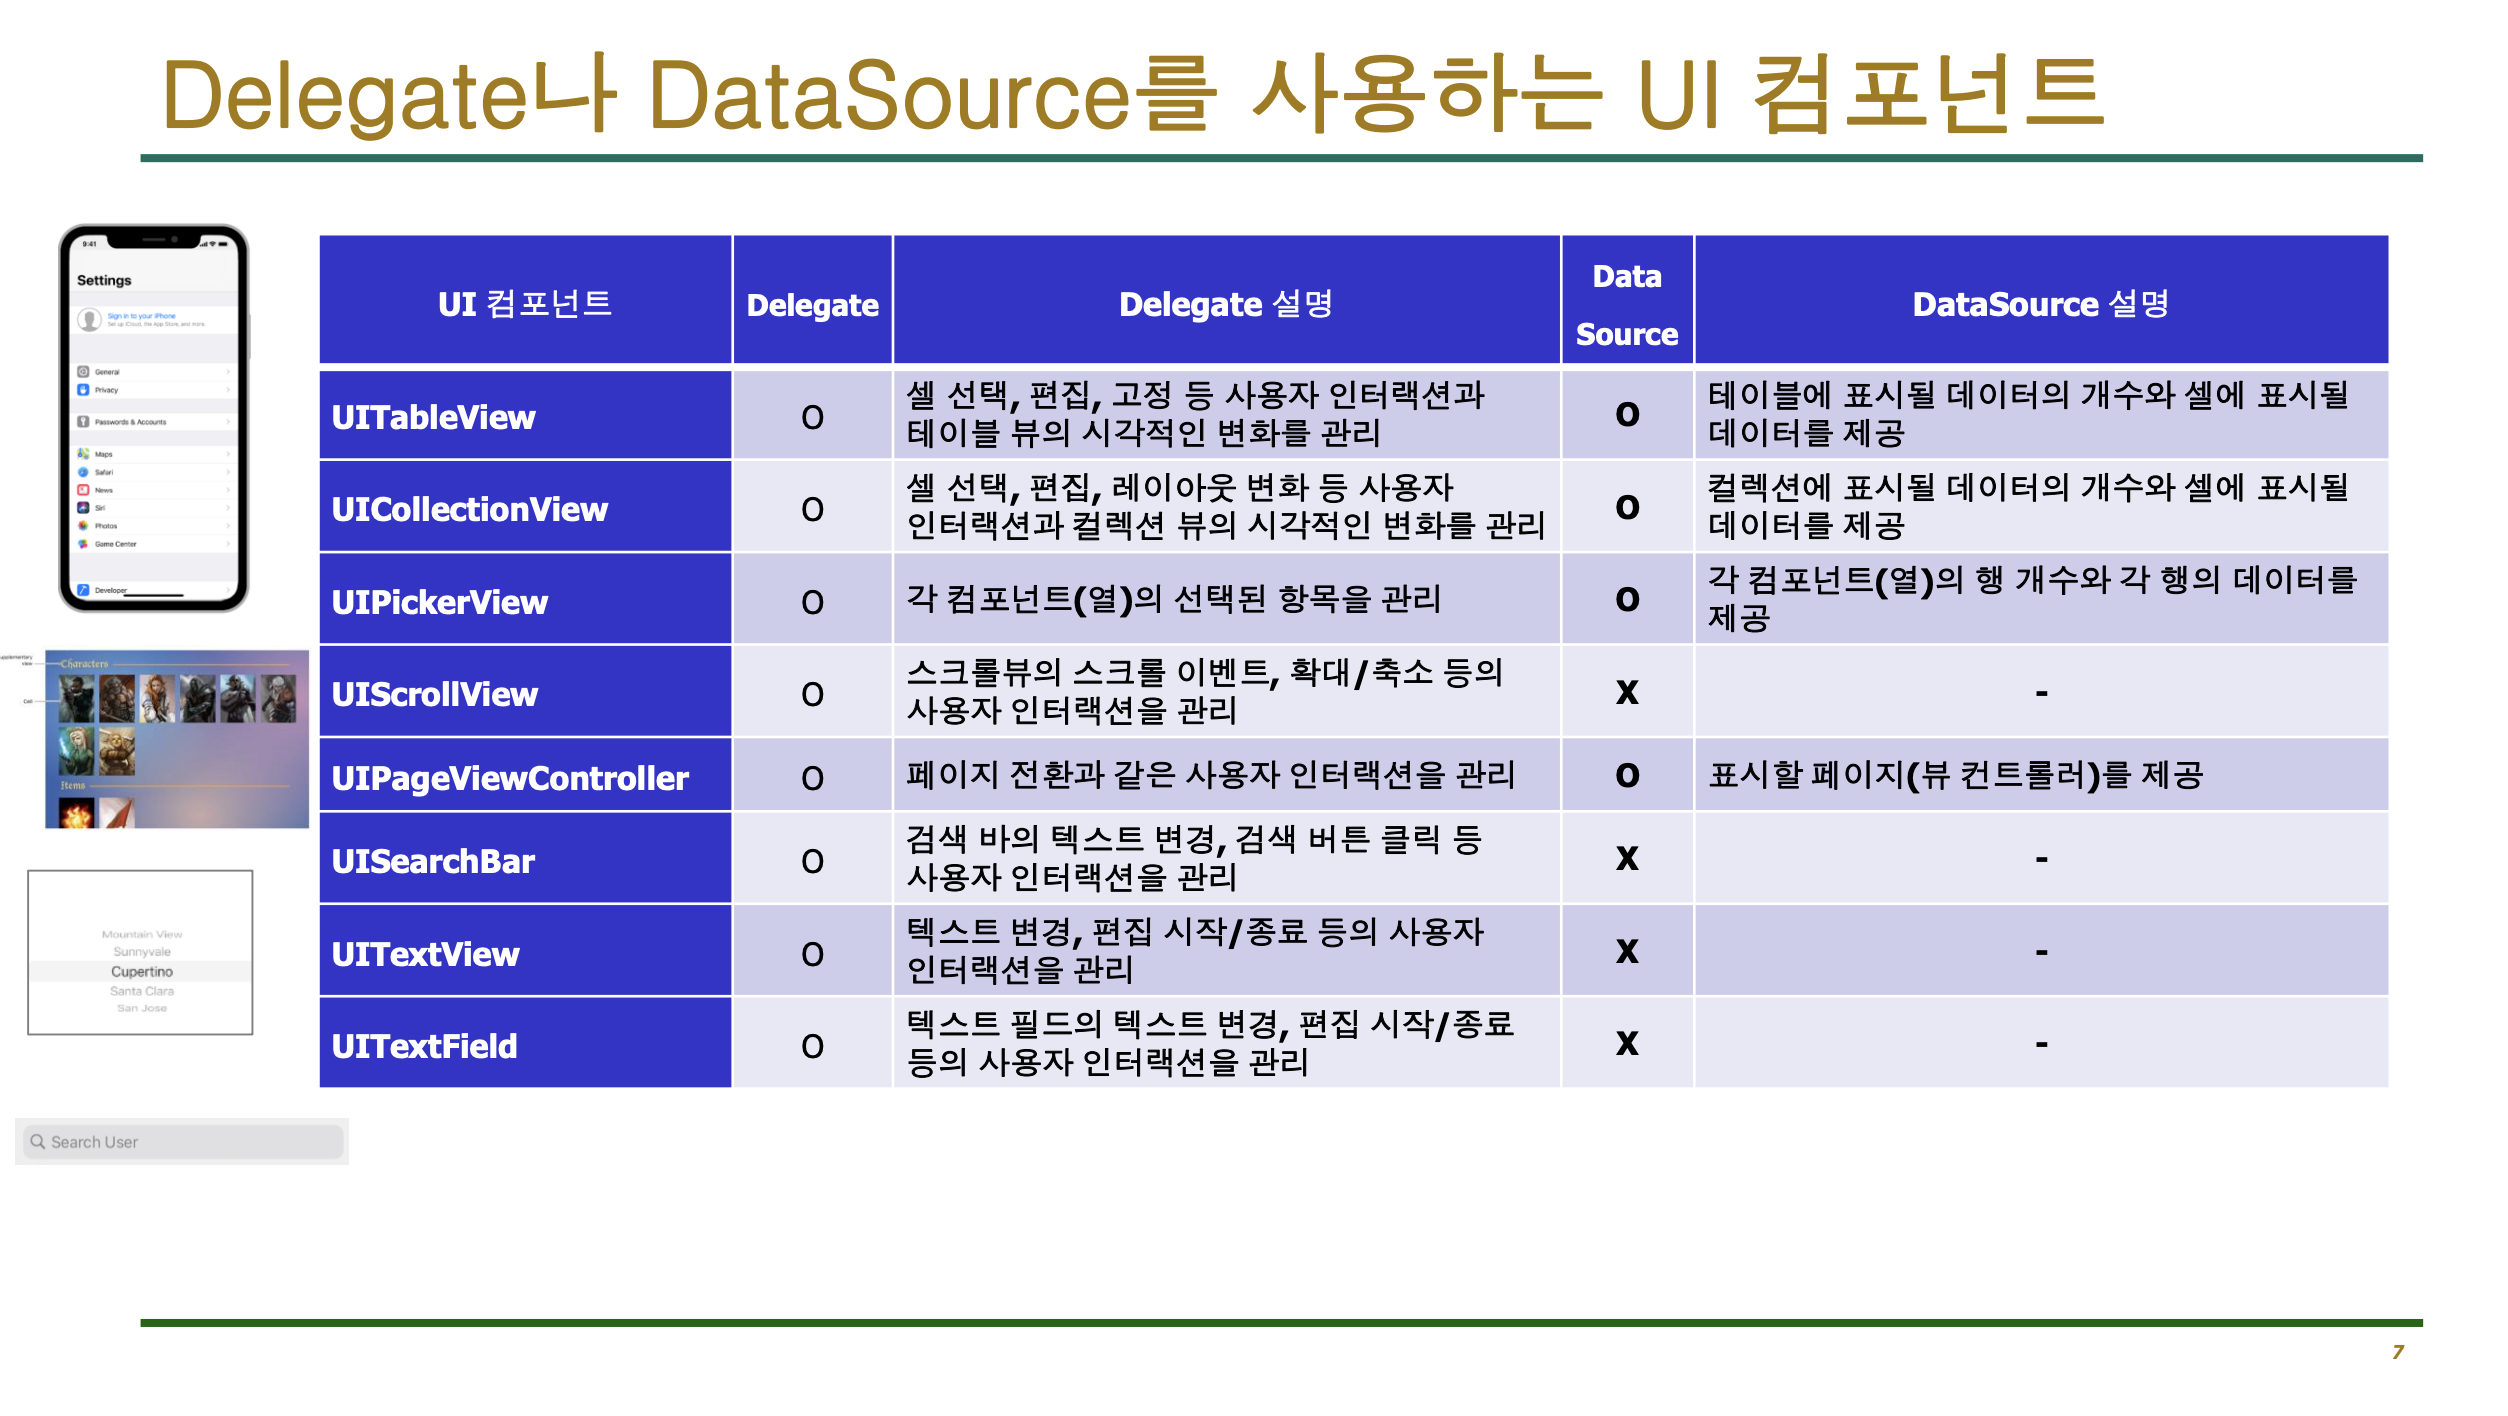
Table View 는 하나의 부모에 두 개의 프로토콜을 사용합니다. 프로토콜은 Delegate 와 DataSource 로 끝납니다.
이 두 가지 프로토콜은 상속을 받는 것이 아닌 채택을 합니다.
실전에서 사용해 보겠습니다.
먼저 Xcode 에서 TableView 를 추가해 주겠습니다.
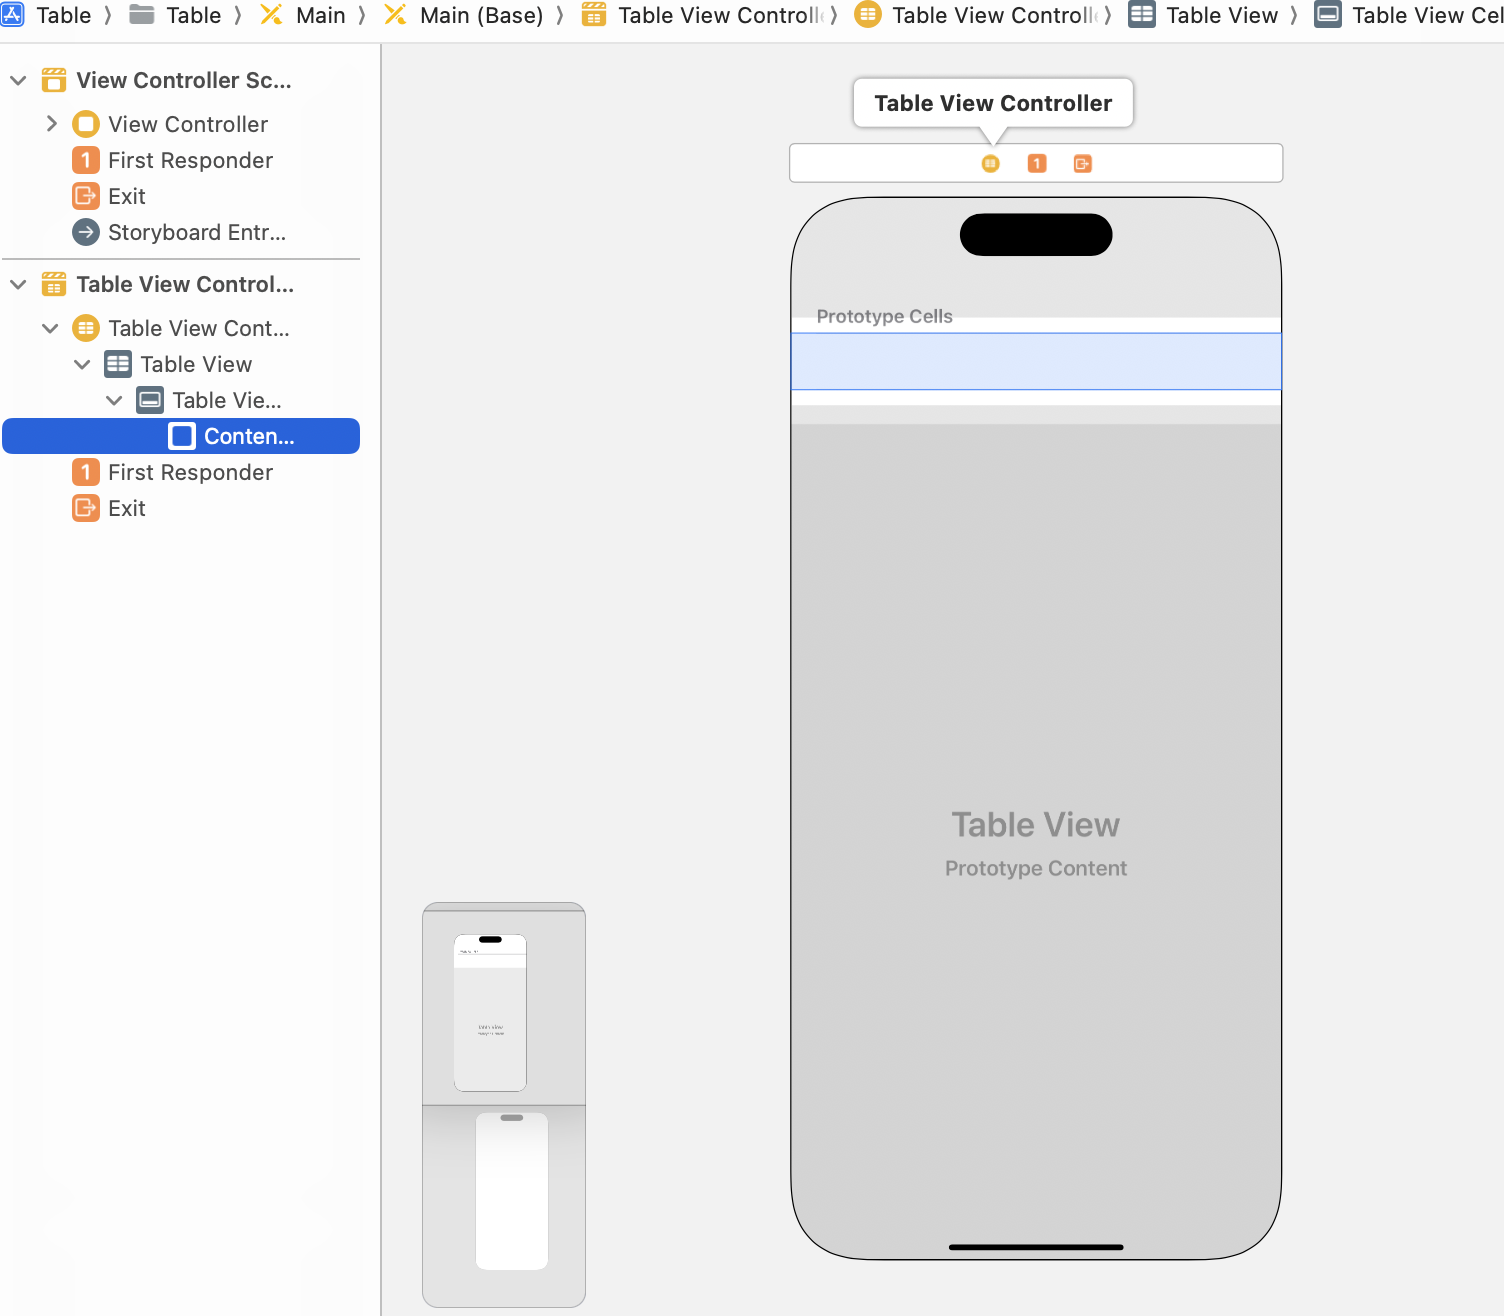
Table View Controller Scene 을 추가해 주면,
자동으로 Table View 와 Table View Cell 이 추가되어 있습니다.
이제 Table View Controller Scene 을 삭제한 뒤,
View Controller Scene 에 Table View 를 추가해 보겠습니다. 그 후에 이 테이블 뷰를 화면에 꽉 차도록 구성하려면 어떻게 해야 될지 설명해 보겠습니다.
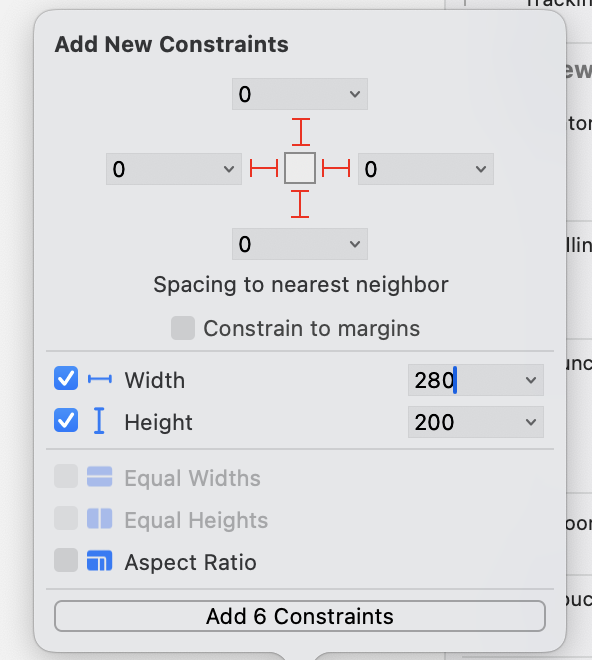
각 방향의 숫자를 모두 0 으로 설정한 뒤 Constrain to margins 를 해지해 주게 된다면,
기본적인 마진조차 사라지고 Safe Area 를 제외한 부분이 Table View 로 가득 채워지게 됩니다.
이제 Outlet 을 설정한 뒤, 코드를 작성해 보겠습니다.
@IBOutlet weak var table: UITableView!아울렛을 연결하였으니, Table View 의 프로토콜을 채택해 보겠습니다.
위에서 설명했던 것과 같이 Delegate, DataSource 두 가지를 직접 채택하겠습니다.
class ViewController: UIViewController, UITabBarDelegate, UITableViewDataSource {
}
하지만 이렇게 채택하게 된다면, Delegate 하나만 채택할 때와 달리 에러가 발생합니다.
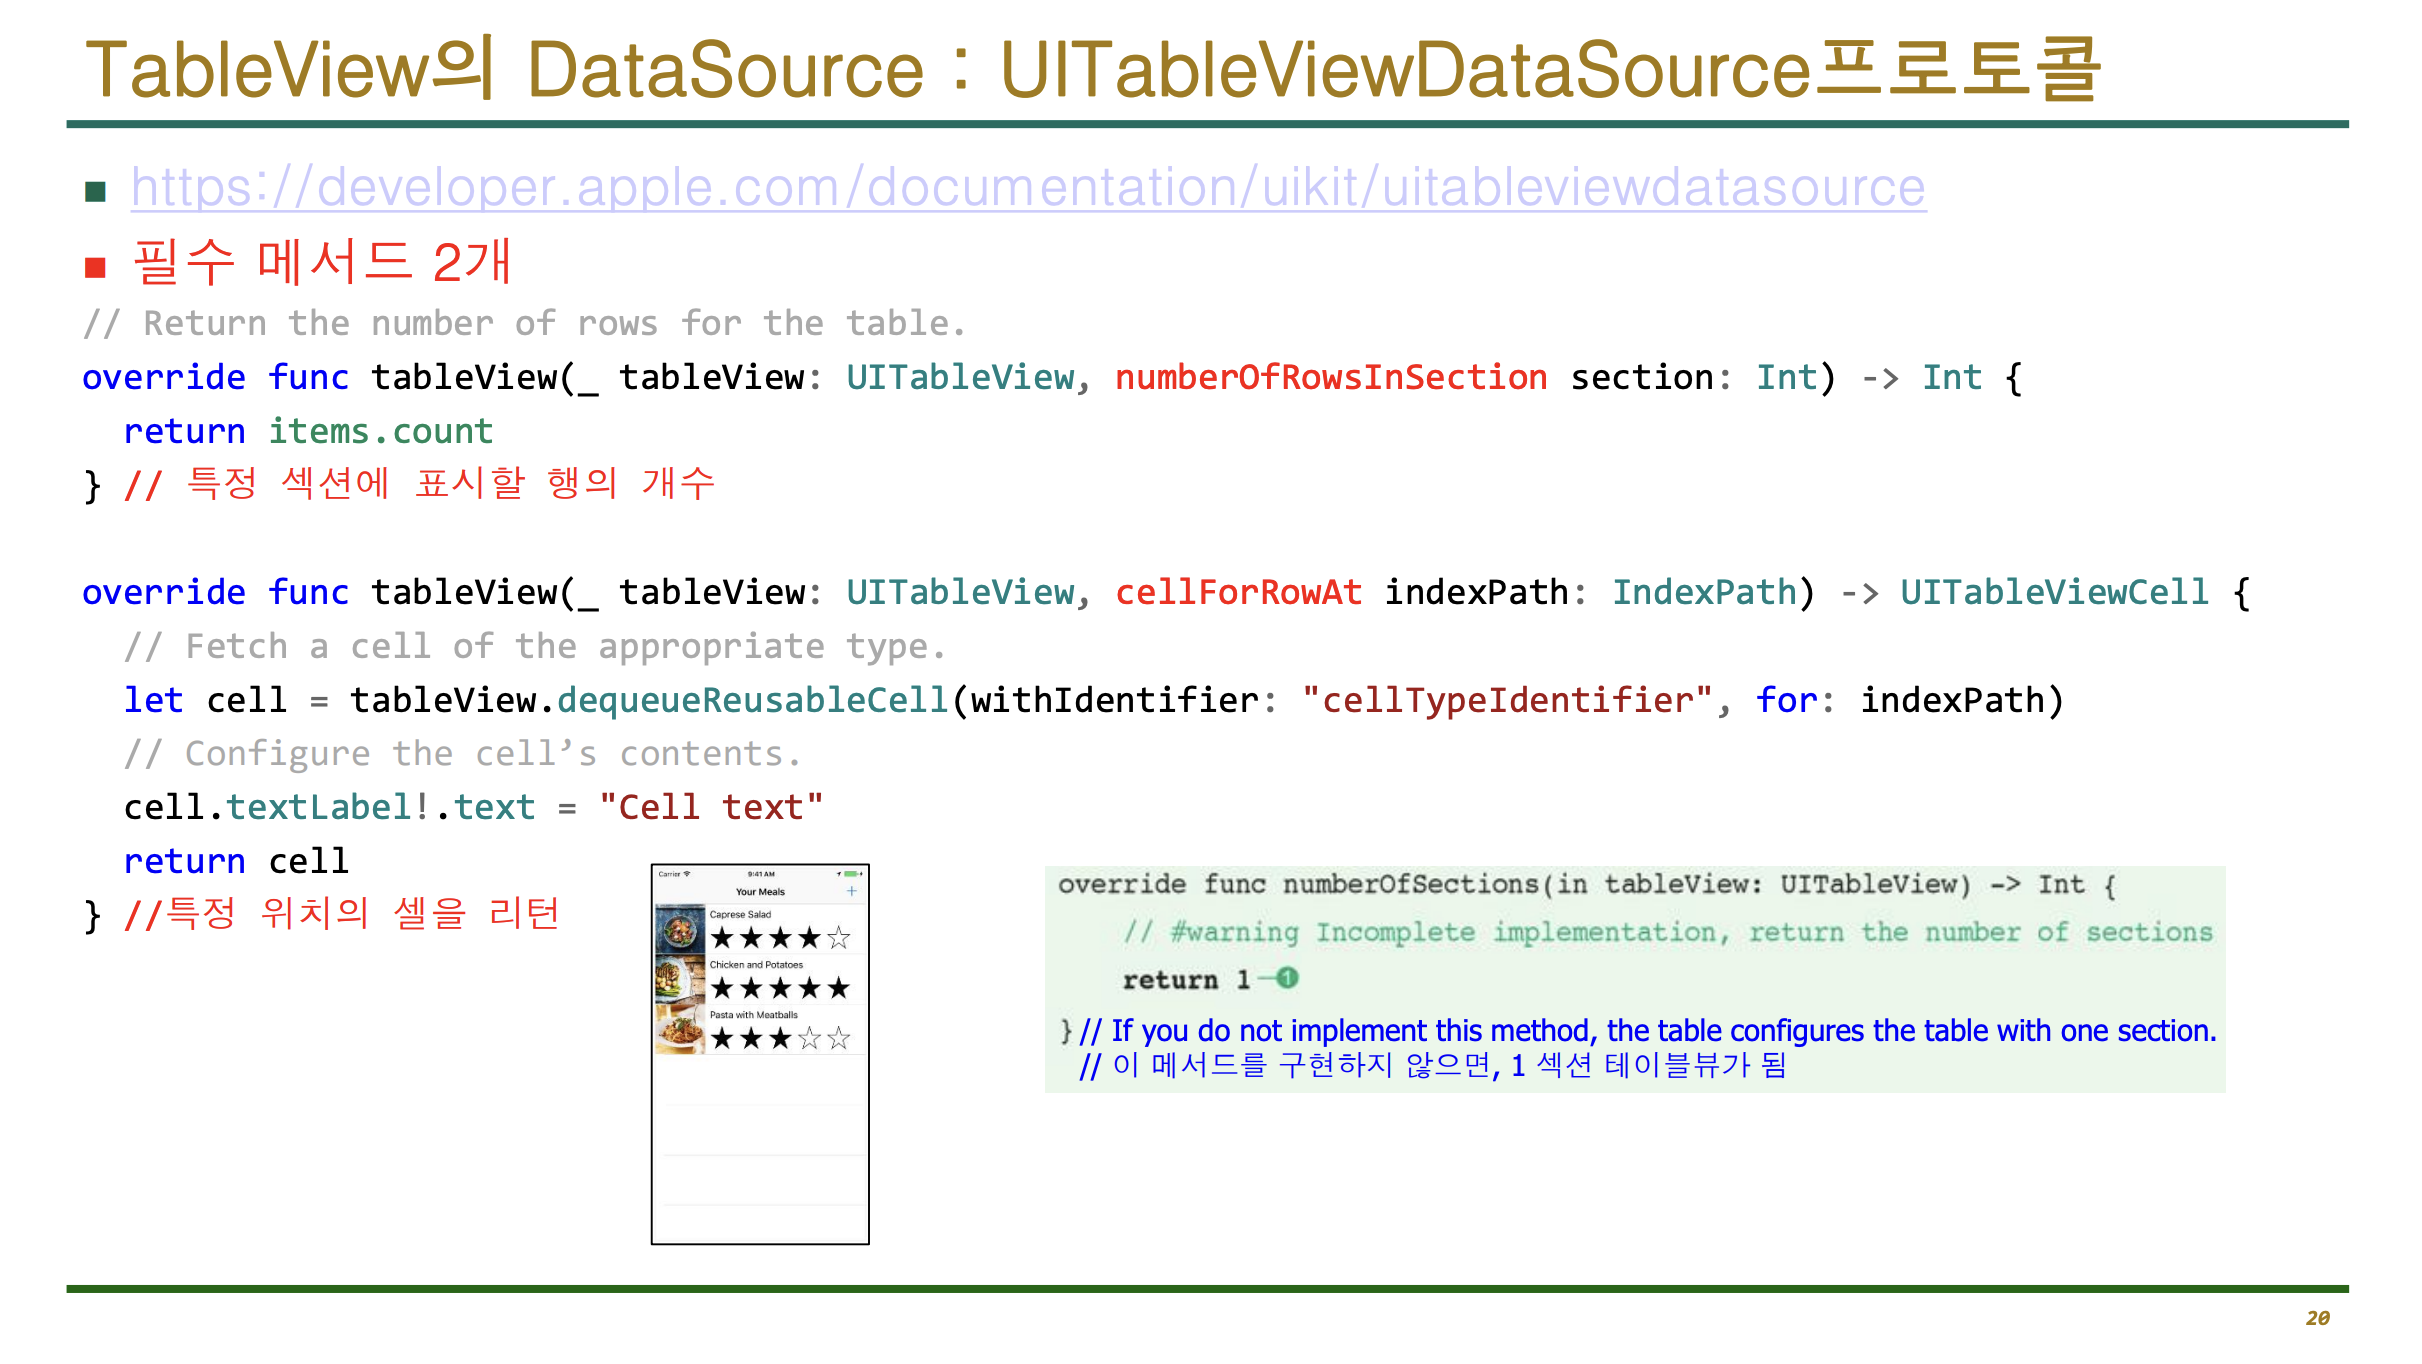
이 프로토콜을 채택한 뒤, 필수 메소드를 구현하지 않았기 때문에 발생하는 문제입니다.
이를 해결해 주기 위해서, 일단 Xcode 에서 기본으로 제공하는 기능으로 Fix 해 보겠습니다.
class ViewController: UIViewController, UITabBarDelegate, UITableViewDataSource {
    func tableView(_ tableView: UITableView, numberOfRowsInSection section: Int) -> Int {
        <#code#>
    }

    func tableView(_ tableView: UITableView, cellForRowAt indexPath: IndexPath) -> UITableViewCell {
        <#code#>
    }
   }
이렇게 수정을 해 주었습니다.
이제 여기에 맞는 코드를 주입해 보아서, 이 에러를 해결해 보겠습니다.
먼저 첫 줄은
func tableView(_ tableView: UITableView, numberOfRowsInSection section: Int) -> Int {
        return 5
    }
몇 줄을 리턴할 것인지 숫자로 나타내 주었습니다.
저는 5 칸을 만들겠다고 적었습니다.
  func tableView(_ tableView: UITableView, cellForRowAt indexPath: IndexPath) -> UITableViewCell {
        let cell = UITableViewCell.init(style: .default, reuseIdentifier: "myCell")
        cell.textLabel?.text = "챎발자"
        return cell
    }
이렇게 코드를 수정해 준 뒤,
  override func viewDidLoad() {
        super.viewDidLoad()
        table.delegate = self
        table.dataSource = self
    }
마무리해 주면, 에러 없이 코드를 작성할 수 있습니다.
import UIKit

class ViewController: UIViewController, UITabBarDelegate, UITableViewDataSource, UITableViewDelegate {

    @IBOutlet weak var table: UITableView!

    func numberOfSections(in tableView: UITableView) -> Int {
        return 3
    }

    func tableView(_ tableView: UITableView, numberOfRowsInSection section: Int) -> Int {
        return 10
    }

    func tableView(_ tableView: UITableView, cellForRowAt indexPath: IndexPath) -> UITableViewCell {
        let cell = UITableViewCell.init(style: .default, reuseIdentifier: "myCell")
        cell.textLabel?.text = "\(indexPath.row)"
        cell.detailTextLabel?.text = indexPath.description
        return cell
    }

    override func viewDidLoad() {
        super.viewDidLoad()
        table.delegate = self
        table.dataSource = self
    }


}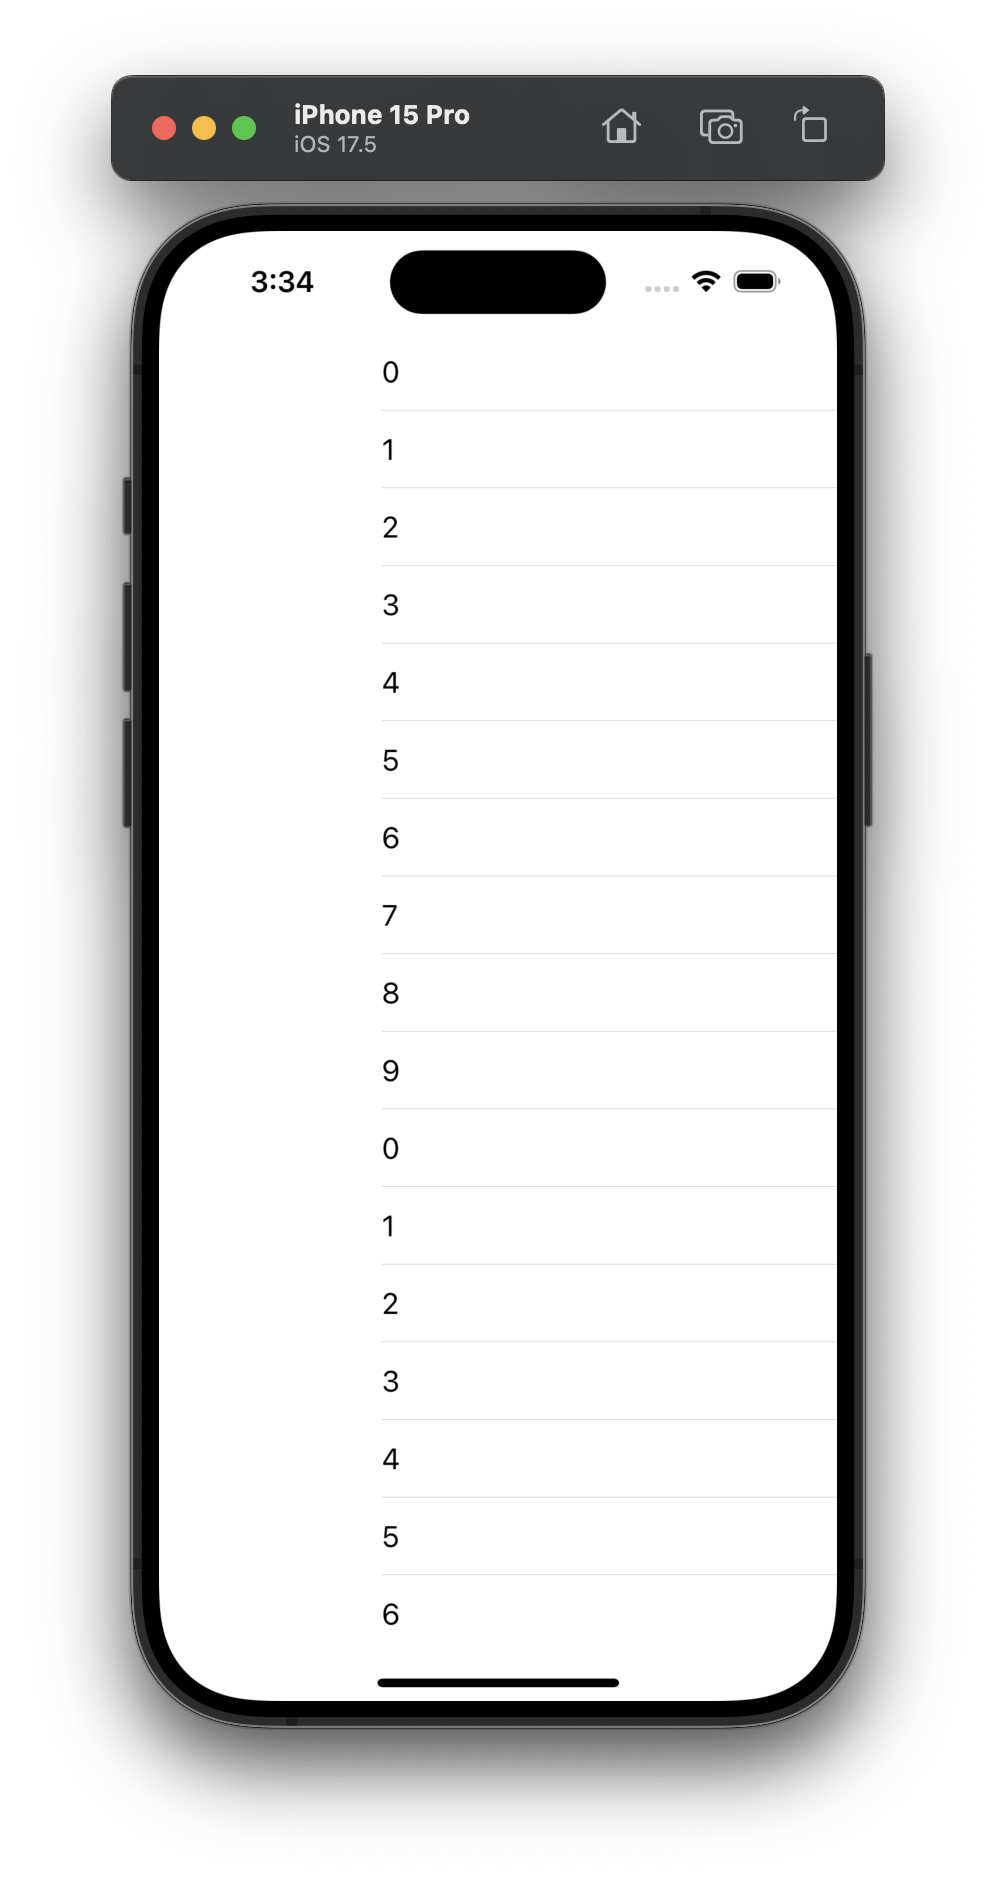

이렇게 출력이 제대로 되고 있습니다.
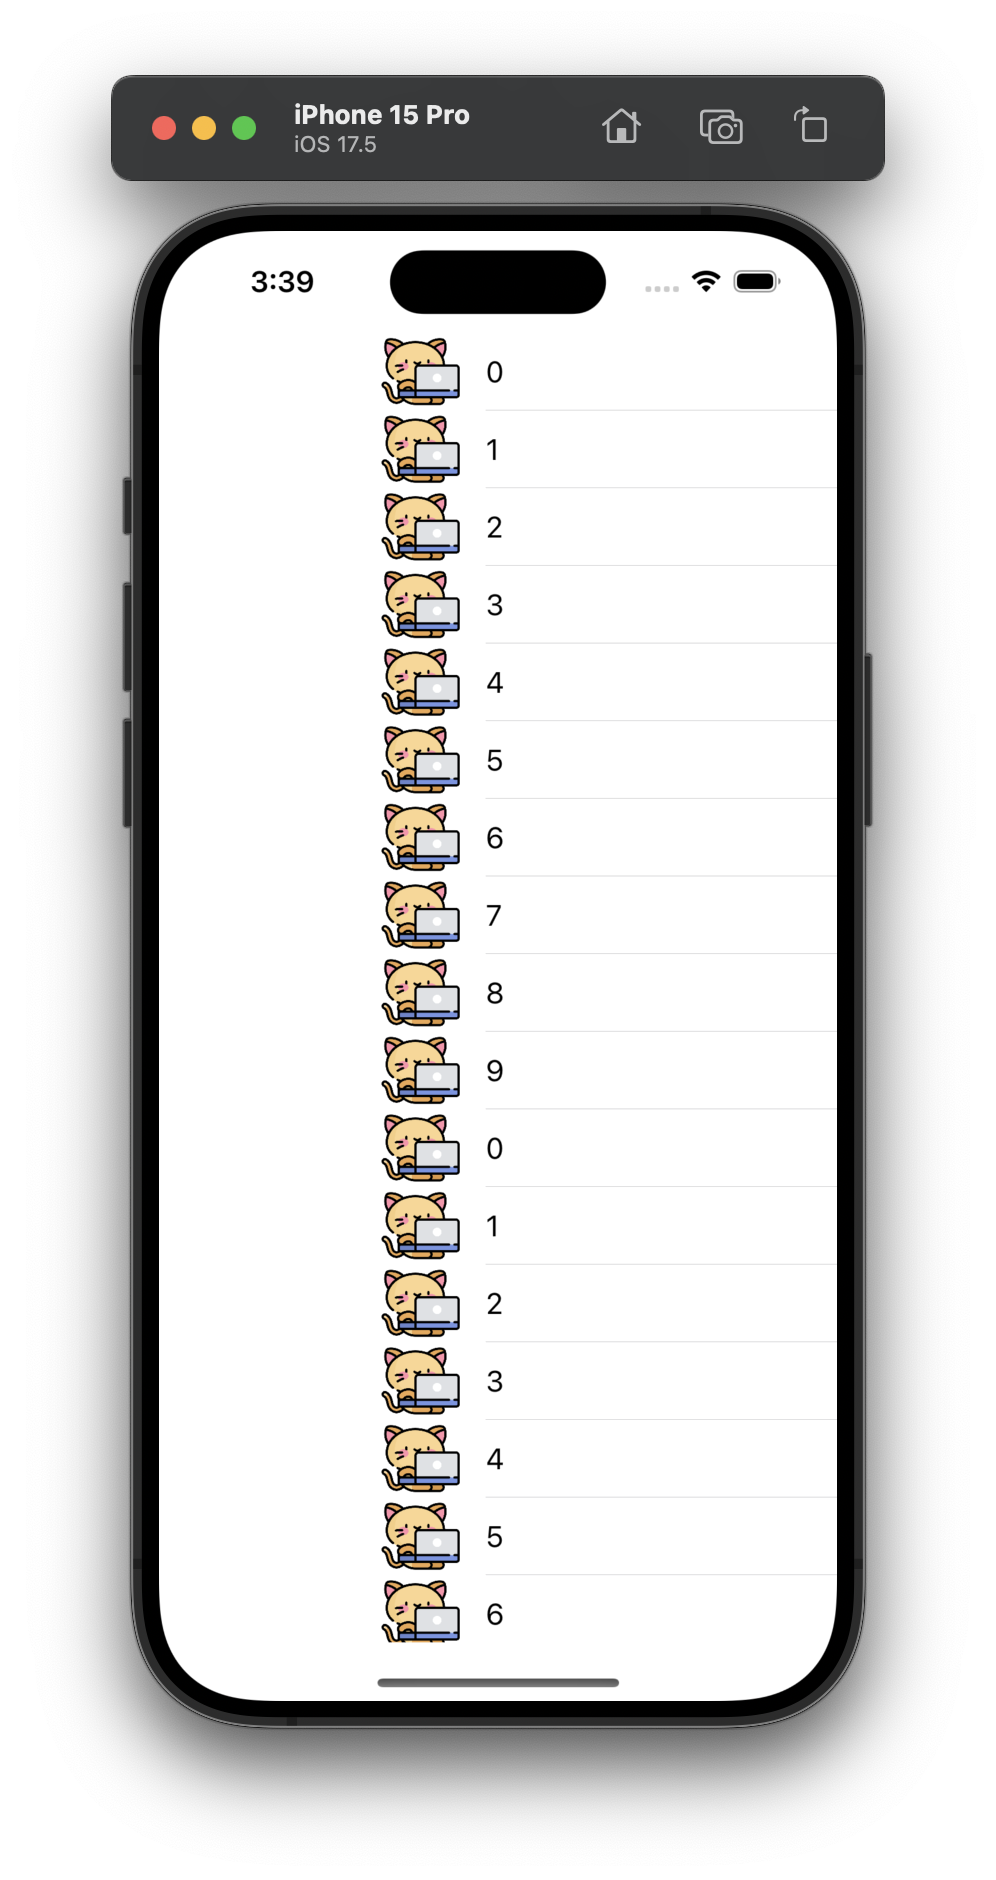
중간과 같이 사진을 함께 출력하고 싶다면,
cell.imageView?.image = UIImage(named: "kitty.png")이렇게 이미지를 추가하면 됩니다.
이제 오른쪽과 같이 다섯 가지의 그림을 각 각 다르게 배치해 보겠습니다.
var image = ["1.png", "2.png", "3.png", "4.png", "5.png"]다섯 가지 이미지를 가져와 준 뒤에,
cell.imageView?.image = UIImage(named: image[indexPath.row])이렇게 row 로 배치해 주게 된다면, 사진이 다섯 개씩 반복되어 나옵니다.
하지만, 텍스트는 음식과 다르게 계속 숫자만 출력이 됩니다.
사진과 같이 음식 이름을 함께 출력해 보는 코드로 수정해 보겠습니다. 사진을 배치한 방식과 똑같이 하면 되겠죠?
import UIKit

var image = ["1.png", "2.png", "3.png", "4.png", "5.png"]
var foodName = ["한식", "간식", "학식", "중식", "집밥"]
class ViewController: UIViewController, UITabBarDelegate, UITableViewDataSource, UITableViewDelegate {

    @IBOutlet weak var table: UITableView!

    func numberOfSections(in tableView: UITableView) -> Int {
        return 6
    }

    func tableView(_ tableView: UITableView, numberOfRowsInSection section: Int) -> Int {
        return 5
    }

    func tableView(_ tableView: UITableView, cellForRowAt indexPath: IndexPath) -> UITableViewCell {
        let cell = UITableViewCell.init(style: .default, reuseIdentifier: "myCell")
        cell.textLabel?.text = foodName[indexPath.row]
        cell.detailTextLabel?.text = indexPath.description
        cell.imageView?.image = UIImage(named: image[indexPath.row])
        return cell

    }

    override func viewDidLoad() {
        super.viewDidLoad()
        table.delegate = self
        table.dataSource = self
    }


}'iOS' 카테고리의 다른 글
| [iOS] 옵셔널 체이닝 Error_Handling Generic Array (0) | 2025.04.09 |
|---|---|
| [iOS] 함수와 클래스 및 상속 (0) | 2025.03.26 |
| [iOS] 무드등 앱 개발 및 Swift 문법 복습 2 (0) | 2025.03.19 |
| [iOS] Swift 문법 복습 (0) | 2025.03.18 |
| [iOS] 생성형 AI 및 오픈 API 활용 (0) | 2025.03.05 |